Showing posts with label fabric. Show all posts

Saturday, 8 March 2014

The Oliver + S 'Family Reunion Dress' ready for action


Oooh it is nice having an uninterrupted block of time to spend on sewing!  

Don't get me wrong, I do get to spend plenty of time sewing, but it's often punctuated with little bits of real life creeping in, like ironing to be done, meals to be prepared, dust to be chased round the house... 

Well today I just concentrated on the one thing, and look - it is done!


I got started yesterday afternoon by being a good girl and tracing the pattern off the original, carefully. 


 I normally plough right on in to the pattern, cutting the size I wish to make, but with the pattern costing £13, I thought I'd make sure I can easily make every size, as and when gifts are required.  It always seems a faff, but to be honest, the hardest thing about it was finding a felt pen that worked!

Next came some sneaky placing of the pattern to make sure I used as little as possible.  With a child's dress, the whole width isn't required so folding a new straight grain line the length of the fabric means that what isn't used is one wider length rather than two narrower pieces.


Will you look at that sunshine!

Next came pinning...


...and cutting...


...and then a break for a nice bit of real life, dinner at a local hostelry with Mr U-t-B (we are daughter-less this weekend as Miss U-t-B is on a geography field trip).

Today as Graham Norton got started on the radio, I fired up the sewing machine and knuckled down.  


First came some pintucks - I do love a pintuck or two!


I found the instructions on the pattern really excellent.  Certain techniques were suggested which I had not come across before, such a sewing a gathering thread close to the edge of the facing in order to achieve a good finish.  I think that with instructions as detailed as they are, these would be good patterns for someone who is relatively inexperienced with dressmaking.  In fact, and I'm not being paid to say this, I think that the quality of the instructions actually makes the price bearable.


The hem has a facing, a technique which I have used before and which I think is excellent on children's clothes as it makes the hem less likely to get caught and fall down. 

 The instructions suggested extra lines of top-stitching near the hem-line, and I was happy to do this!  I find that the key to neat top-stitching is to use the presser foot as your best friend - keep your eye on the presser foot edge going down the line, never on the needle.


I chose flower buttons to both embellish the centre front tab, and for the back closure...


If you follow the instructions, you get a neat finish outside and in...


By the time Graham had solved workplace and pet-related problems, chatted with Angus Deayton and Rupert Penry-Jones, and played some rather excellent music (notably Jack Savoretti, Gabby Young & Other Animals, George Wilding and London Grammar) and Tony Blackburn had played the best of 1974 and 1985 (did that REALLY include The Wombles?  Seriously...) I was done!


Good thing I bought that extra length of cloth, eh?

Thanks again to The Village Haberdashery, for the excellent service which allowed me to while away my time so pleasurably! 


Friday, 7 March 2014

I told you they were quick!


Look what we have here...


A lovely soft, squidgy, delight-filled package from 


(trumpet fanfare please!)


Ordered a little before 9am yesterday, after much dressmakey-dithering and dreaming from the comfort of my own chair, this arrived with Mr Postie this very morning!

The Family Reunion dress can be made this weekend, as planned.

(Ooops...You may have spotted that the red fabric and pattern for those are not all that I purchased.  A certain little something slipped in the online basket for me, that lovely Palos Verde 'Miraleste' I've been hankering after.  Well, it'd be silly to waste the £2.75 flat rate postage on just two items...)


So that's me sorted for the weekend!

Thursday, 27 February 2014

How to get other people to pay for your clothes


I did another bit of dressmaking last week, following on from the Valori Wells tunic I made a few weeks back.


This time, I bought some fabric on ebay from 'Favourite Fabrics'.  I have used them several times before and have always received my fabrics quickly, which luckily was the case once again this time.  I'd chosen this fabric...


...which now seems to have sold out, maybe as it was only £5.99 a metre.  I hadn't yet decided what pattern I was going to use, but ordered two metres knowing that would be about right.

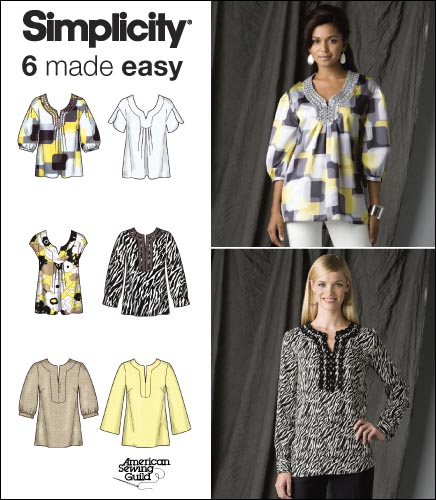
In the end I chose to use a different pattern to last time - New Look 6010.


Picture courtesy of SewEssential.co.uk


I have quite a few blouses of this sort of style and find them comfortable and easy to wear, but recently have found it harder to track down ones I like in the shops, especially at anything like a sensible price.  So making some myself seemed like a good option.  I decided to make view D, but I intended customising the sleeves, which in this pattern have elasticated cuffs, where I wanted a button closure, like on the tunic I made previously.

I was surprised to find that once pinned the blouse out that I had LOADS of fabric left over.  The pattern was a fairly easy one to make, certainly a little more straightforward than the tunic one I used previously, which was this one... 


Picture courtesy of SewingPatternReview.com


I created a new sleeve pattern by combining the top part of the New Look sleeve with the bottom part of the Simplicity one.  

And here's the finished article!


I had this idea that with 'The Great British Sewing Bee' back on our TVs, I'd try to do one of task from each episode.  In the end though, I only managed the buttonloops from programme one!   I'm tempted to make Mr U-t-B some dashing striped and piped pyjamas from programme 2, but I think I'm already running too far behind!


I found some sweet little flower buttons in my local haberdashery...


And it fits...


So what about the left over fabric?

There was enough to make another of my oh-so-frequently-made Japanese smock tops...


Now if I just sell this little smock for £12, I make that a free blouse for me!


I have one more blouse pattern to try out and with pay day tomorrow I am considering these fabrics...


Palos Verde Abalone Cove


Palos Verde Miraleste

Palos Verde Lunada Bay


Friday, 7 February 2014

Fabric-alicious friday


Work being finished for the time being, I felt I could treat myself to a little bit of fabric indulgence.  

Liberty Tana lawn indulgence!

Some patchwork is planned, so lots of little bits were required.

Pinks and turquoises...


And then LOTS of purple-y hues, to go with a suitcase I plan on doing out as a sewing basket.


I tried to be clever putting the names on the photos, but it was impossible to choose a colour that showed up for some.  

This one is called Poppy and Daisy, Petal and Bud.  


It is the same print as Poppy and Daisy but on a smaller scale.  I am very taken with this one, which I hadn't seen before, and feel a tunic might be required!  Tana lawn may not be the cheapest of fabrics, but I know that it lasts and lasts, so it is worth the investment.

This is the Poppy and Daisy that is normally seen...


'Pepper' is the first Liberty print I ever remember buying - from 'Galeries Lafayette' in Paris when I was eighteen!  Ooh la-la! 


Wiltshire


Thorpe


Today I will be working with the one and a half inch squares I cut yesterday. Back with the results soon!

If you like Liberty prints and want small pieces to work with, I can highly recommend the following two links, both of which have given me super fast service.


And if you're after metres of the lovely stuff, it's worth visiting


for discounted prices (just remember the price on the website is without VAT).

Off to do some stitching!


Sunday, 4 August 2013

Tidying up my sewing table


For a very long time, my battered sewing table looked like this...


Everything I needed was close to hand, but in an awkward way.  The sewing machine was on a couple of chunky crochet mats, a pair of scissors and a seam ripper were normally hanging about nearby,  there was a tin of pins, a pincushion  and an old preserving jar in which to put all the cut threads.  Oh and my self-covered, Cath Kidston radio - don't forget the radio! (The hazardous making of which you can read about here and here.)


But everything was sort-of on the wrong side for me, a right-handed person, and also I kept scooting things off the table as the fabric passed through the sewing machine.  


It was time to create something to serve my purposes better!


First I created some random patchwork.    I made three strips, each of which measured 36" by 4", made up of  2" squares, 4" squares, 4 x 2" rectangles and 6 x 4" rectangles.  I was able to use up lots of scraps I had around the place - quite a lot was Tilda leftovers from another project, but I added in some other favourites, as it was going to be nice way to preserve them!


To make my runner, I cut 

24          2 1/2"    squares
18          4 1/2"    by   2 1/2" rectangles
6            4 1/2"    by   6 1/2" rectangles
3            4 1/2"    squares

I divided those up to make three strips which I arranged differently so each strip was unique, then sewed the strips together to make my 36" by 12" strip.


I found a suitable sized piece of backing fabric (part of a pretty, old, cotton duvet cover) and a remnant of batting.  I quilted the piece with horizontal and vertical lines in a sort-of random way, then bound it with a super long length of 2 1/2" strips which I had sewn together simply (not joined diagonally as you would normally do) and used folded in half.


Then I set about making some pockets to attach to the right hand end, that was going to dangle over the side of the table.


One was to be a thread bin (I hoped fabric would be better for this than the glass had been as threads 'stick' to my rough fingertips - I reckoned I could swipe the threads on the fabric).  This was a lined pocket with a channel sewn at the top and some 'boning' threaded through to keep it open.  Having no actual boning to hand, I used a section cut from the top of a family-size yogurt pot!  Worked a treat!


The other pocket was for small scissors and a seam-ripper.  

These were simply sewn onto the finished runner and embellished with buttons.

My final addition to the runner was a  built in pincushion.  I selected an area about four inch square in the central patchwork strip to the right of where the sewing machine would be.  I made sure this had been quilted all the way round, then cut a small slit in the backing and lightly stuffed the square.  I also squeezed in two small, super-strong magnets (salvaged from old computers) before whip-stitching the slit and placing a neat patch over it.  


This created an area where I can stab my pins, and two corners where I can place safety pins and needles and know they won't end up on the floor (and from thence into my foot!)


My desk looks much more swish now!