Blanket Stitch
Blanket stitch (which is basically the same as buttonhole stitch, just more spread out) is very useful for both stitching two pieces of fabric together and for decoration. I use it for practically everything I make out of wool felt, but here are a couple of examples...
 |
| Blanket stitch used partly to attach and partly to decorate on a brooch |
 |
| Blanket stitch used to stitch shoe parts together |
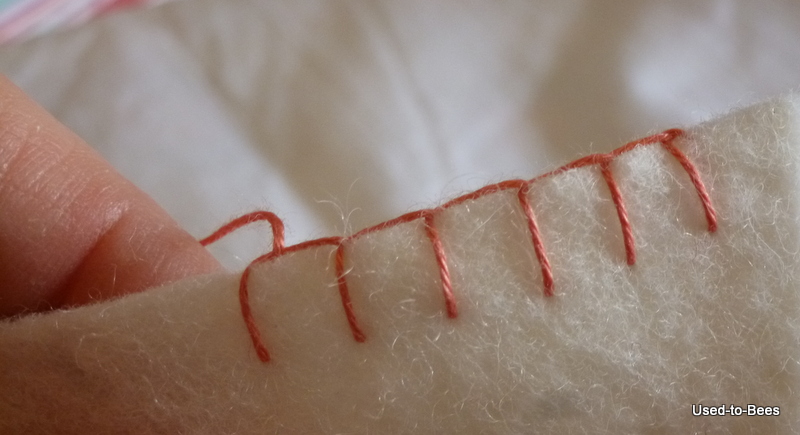
Begin by bringing your thread out at the very edge of the fabric, at the right hand side of the line you wish to stitch. A lot of instructions will tell you to bring the thread out about a centimetre away from the edge, but I find that if I do this, my first stitch does not have the squareness I like! (You could work left to right instead, but for me, a right-handed person, right to left works best.)

Push the needle back into the fabric directly below the start point...

...then make sure the thread is below the needle as you pull it through...

Pull through all the way, but don't overtighten!

Push your needle back into the fabric about 1cm away from the bottom of the first stitch, keeping the thread below the needle.

Pull through to form your second stitch.

Continue...

You will get into a rhythm with this stitch very quickly ...
...and will soon find it appearing everywhere in your sewing!

French Knot
For many a long year, I could not do a French Knot properly. It was a source of frustration, and when I finally watched a clip on YouTube and cracked it, I was a very happy bunny indeed.
The key to success, I think, is trapping the little twists of thread under your thumb as you pull the thread through to the back. Once I started doing this, I was well and truly away.
French Knots are great texture builders in a piece of embroidery. I use them liberally, but especially for roses...

...flowers...

...and eyes...

Here's how...
Bring your thread up where you wish your knot to be.

Holding the thread in your left hand...

...wind the thread once or twice around the needle, close to the fabric and exit point.

Still keeping the thread taut-ish with your left thumb, push the needle back into the fabric, just a smidgeon away from the exit point. (If you go right into the exit point you will watch your stitch disappear!)

Slowly slightly tauten the thread with your left thumb and forefinger, so the little whirls of thread are right where the needle enters the fabric, then trap the thread again with your left thumb and forefinger...

... whilst you pull the needle through the fabric.

Just as the last little loop is ready to be pulled through release your left thumb and forefinger...

...pull a little more to make that loop disappear, and sit back with satisfaction as you gaze on your perfect little knot!

Lazy Daisy Stitch
Lazy daisy stitch (which is the basis for chain stitch) is frequently used to make sweet little daisy like flowers, such as these (stitched by some lovely lady way-back-when and salvaged by me to be turned into a scissor case)...

or these...

I also use them in pairs to make little flowers like this...

They are very easy.Here goes...
Bring your thread out - this will be the pointy end of the petal.

Trap the thread off to the left and push your needle back into the fabric just a smidgeon away from the exit point...

...bringing it back up a petal-length away.

Bring the thread under the needle...

...then slowly pull through to create the petal. Gently pull to get your petal to lie flat, but don't pull too tight!

Now simply make a litle stitch over the petal-loop to hold it in place.

If you're going to build a flower, simply repeat, always starting just a little away from the last petal.

Six-point cross-stitch
I don't think this is a bona-fide embroiderer's stitch, but what the heck, I use it a lot! It makes lovely little flowers , and I rather like its haphazard non-bona-fide nature.
Here it is beside the seaside...

...and in a cottage garden...

Start off with a straight stitch, then bring your needle up at about ten o'clock to the original stitch, if you see what I mean. (Sorry - it would have helped if I'd started with a vertical stitch - will try to re-photograph!)

Form a second stitch, pushing the needle back in at 4 o'clock and out at 8 o'clock...

...before finally pushing the needle to the back at 2 o'clock.


These are also a perfect start to any snowflake embroidery...

Stem Stitch
My stem stitch used to be, quite frankly, rubbish. Then (familiar story here) I looked it up on the internet and found that I was missing two points. Firstly, either keep your thread below your work at all times, or above it at all times. The line will look different depending on which you do.
(Actually, some places say keeping it below gives you stem stitch, keeping it above gives you 'Outline' stitch.)
Secondly, with each stitch you need to go back almost to the exit point of the thread to get a nice smooth line.
So, beginning at the left of the work, bring your thread out.

Take a small stitch backwards, bringing the emerging needle out close by to where the thread is exiting.

Pull to tighten (not too much though!)

Keep the thread below the stitching, take another small stitch backwards, bringing the needle back up close to where the last stitch ended. It's a sort of'two-steps-forward-and-one-step-back' motion.

Continue, always keeping your thread below. Your line can be straight or curved.

Perfect for branches and thin trunks, it can also be used for 'drawing' with thread, as was done in this anti-macassar which I turned into a cushion...

Hi.. this is a nice post.Basic stitches of the clothes are look very fantastic .Every person like good stitches as funny.Thanks for this tips.basic embroidery stitches
ReplyDelete