Showing posts with label Japanese dressmaking patterns. Show all posts

Thursday, 27 February 2014

How to get other people to pay for your clothes


I did another bit of dressmaking last week, following on from the Valori Wells tunic I made a few weeks back.


This time, I bought some fabric on ebay from 'Favourite Fabrics'.  I have used them several times before and have always received my fabrics quickly, which luckily was the case once again this time.  I'd chosen this fabric...


...which now seems to have sold out, maybe as it was only £5.99 a metre.  I hadn't yet decided what pattern I was going to use, but ordered two metres knowing that would be about right.

In the end I chose to use a different pattern to last time - New Look 6010.


Picture courtesy of SewEssential.co.uk


I have quite a few blouses of this sort of style and find them comfortable and easy to wear, but recently have found it harder to track down ones I like in the shops, especially at anything like a sensible price.  So making some myself seemed like a good option.  I decided to make view D, but I intended customising the sleeves, which in this pattern have elasticated cuffs, where I wanted a button closure, like on the tunic I made previously.

I was surprised to find that once pinned the blouse out that I had LOADS of fabric left over.  The pattern was a fairly easy one to make, certainly a little more straightforward than the tunic one I used previously, which was this one... 
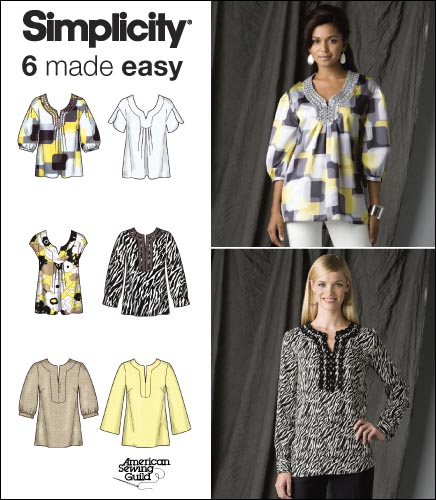

Picture courtesy of SewingPatternReview.com


I created a new sleeve pattern by combining the top part of the New Look sleeve with the bottom part of the Simplicity one.  

And here's the finished article!


I had this idea that with 'The Great British Sewing Bee' back on our TVs, I'd try to do one of task from each episode.  In the end though, I only managed the buttonloops from programme one!   I'm tempted to make Mr U-t-B some dashing striped and piped pyjamas from programme 2, but I think I'm already running too far behind!


I found some sweet little flower buttons in my local haberdashery...


And it fits...


So what about the left over fabric?

There was enough to make another of my oh-so-frequently-made Japanese smock tops...


Now if I just sell this little smock for £12, I make that a free blouse for me!


I have one more blouse pattern to try out and with pay day tomorrow I am considering these fabrics...


Palos Verde Abalone Cove


Palos Verde Miraleste

Palos Verde Lunada Bay


Thursday, 8 August 2013

Rag Bag Rescue - East Dress


A little while back a pretty kaftan came into the charity warehouse.  It was too faded and rubbed at the bound edges to go into one of the shops to sell, so I asked if I could do a transformation on it.  

Here it is before I got to work with the scissors!  The colours are really pretty, and I love the Indian block print type fabric.


Being a kaftan, there was plenty of fabric to work with.  

First I made a little dress from a well-used pattern (McCalls 6059)...


Next, I used some complementary fabric from my stash ( might be yarn-dyed Essex linen)  to make some shorts.  I trimmed the pocket edges with scraps from the kaftan...


...And  changed the cuffs into tie ones, with the facings offering another glimpse of kaftan!


I am still loving using a twin needle for most top-stitching.  All those years I didn't know I could simply thread up two spools from the top to achieve this...


There was still a good deal of fabric left, so onwards and forwards it was to find a pattern I could squeeze onto the remaining bits.  The tiered summer top from my favourite Japanese children's dressmaking book was just the ticket.  


I already managed to sell the dress to the manager of the warehouse, so the charity is a tenner up already.  If I can just sell the other two, I hope I will have made about £30 in total, from one item that would have been worth pennies (or less) in the ragbag.  Hoorah!

Thursday, 18 July 2013

Rag Bag Rescue - Blokey Shirt to Birdy Smock


I might easily have called this post 'A Series of Unfortunate Events' as I made so many mistakes in its making, but in the end, I think it turned out okay!


A couple of weeks ago I rescued this man's shirt from the Rag Bag at the charity shop.  It had been consigned there due to its floppy, well-washed status, and a few pesky stains. But it was a nice large size in lovely chambray-type fabric, and I thought would be good for a re-make.


First I made a new pattern - well, actually a familiar pattern in a larger size. This was to be a 110cm size, aimed at a 4-5 year old.  It is from this Japanese book., which is now available, with a different front cover, in English.  (You can buy it on Amazon, but they aren't paying me for a plug!)


I have made loads of these smocks now.  Such a sweet and easy-to-wear design.


First I had to lay my pattern pieces out to see if I could get it all out of the decent parts of the fabric, going with the straight grain.  The front and the top part of the back fitted on the back section...


The two bottom back sections fitted on the front pieces, beneath the large breast pockets.  These pieces were meant to be one, cut on a fold, but I reckoned that a centre back seam was going to be okay.


It was a push to fit the two sleeve sections as the shirt sleeves were made of one wide and one narrow panel, reducing the available width.   It was just do-able though!  

My first mistake was that I had drafted the bottom sleeve section without adding the necessary seam allowances ( I normally add the seam allowances to my paper pattern pieces, otherwise I know I WILL cut something wrong!).  I merrily cut the pieces out before remembering the lack of seam allowance on that one piece!  There was no altenative but to go ahead with making the sleeves slightly shorter and less full than they should have been.


So, with all my pieces cut I stitched away.  The pin-tucks, which I messed up last time and had to press the wrong way and embellish...


...I got right this time!

But then I stitched the back to the front section right side to wrong side, ending up with the tuck on the back instead of the front.  But I decided that I quite liked this as an alternative, so left it.


I used some pretty 'Felicite' from Liberty as the binding and embellished with some weeny polkadot buttons.


My next problem was a hitherto unseen stain, right slap-bang in the middle of the front!  I knew it would be noticeable where it was.  There was nothing to be done but to find a decorative way to cover it up!


A bit more 'Felicite' and the design I used in my recent ATC swap...


...and the front acquired a trio of swooping birds!


Sleeve edges, hem and neckline were all 'Felicite' bound.  The button loop too...


Ta-dah!


Saturday, 11 May 2013

Sew and Tell Saturday


It's been ages since I've remembered to post something in the way of dressmaking here, but I have finally got myself organised to do so!  I've actually done quite a lot of dressmaking recently, which may well be something to do with 'The Great British Sewing Bee', which I really enjoyed.  

Ann, the deserved winner, was an inspiration, her skills a true testament to the value of experience built up over years.  I can't imagine how it must have been for the contestants though, having to rustle garments up in such short amounts of time - I would have a fit rushing like that!

Even without rushing, I made an error with both of the makes I am showing today.


I was using a pattern I have used before, from The Girls Style Book, a Japanese pattern book. 


The pattern I was using I have made several times before, maybe that's why I got blase and made the mistake...


Such a sweet top, and easy to wear, I'd imagine.


I believe you can now get this book in English (Amazon have it listed here) but mine is in Japanese, so is somewhat annotated...


I had decided to make two smocks as I had two small peeps in mind for receiving them.

One was made from a very soft pink paisley , a long length of which was picked up in a charity shop some years ago...


And the other from a very sweet pale grey 'Westfalenstoffe' floral print I bought ages ago from 'Dragonfly Fabrics'. 


Can you spot the mistake? 
A zoom in might help...


My tucks all lie the wrong way!  I don't know what I did (sloppy cutting out is my suspicion) but once the tucks were all made I didn't have a rounded neckline, but an impossibly uneven one, so I had to press them all the wrong way.  And they didn't really want to lie flat that way, so I added braid and button trim to force them into submission.  Oh well!

I'm okay with the end results but will be more careful next time.  I love this pattern, so I KNOW there will be a next time!

In the meantime, I have proof for Mr U-t-B, who was threatening to apply, on my behalf, for the next series of The Sewing Bee, that I am not ready for such a challenge!

I am linking up today with 'Sew and Tell Saturday' at Sew Country Chick.  Pop over if you're looking for dressmaking inspiration!

Sunday, 24 March 2013

Rag Bag Rescue - Babycord Shorts and Liberty Smock


If I'm honest this isn't exactly a Rag Bag Rescue in the same sense as the others I have done, as the only part of this that came from the charity shop is a triangle of felted cashmere no larger than an inch square!  


But the bottom half of this outfit is made with an item pulled from my very own 'rag bag',  the large Victorian trunk that sits in our attic room filled with larger pieces of fabric and old items of clothing that I can't bear to part with, all awaiting a transformation.


I love my trunk's original papered lid and the manufacturer's label


Something I had failed to part with, in spite of its ordinariness, was this navy baby cord skirt.  It's probably been languishing in the trunk for about twenty-five years - honestly!  But it had become so soft and comforting through all the washes it had in its life as a useful 'school' skirt that I was sure it would be useful - one day.  


The sellotaped hem a clear sign of days rushing out to work, with no time to pick up a needle to catch up the fallen hem!


The skirt was quickly deconstructed - waistband off, zip out...


Iron to prepare for pattern cutting...


Establish straight grain (easy with cord, otherwise use centre seams, in general) and cut pattern pieces...


A pair of bloomer-style shorts with front patch pockets were easily cut from the skirt, suitable for a two year old. 


 Then I found a length of Liberty Tana lawn that and made a smock to go with the shorts...


Front detail...


Back closure...


I edged the smock with some broderie anglaise salvaged from pyjamas I made when I was 18, but the pockets were missing something...


Ah!  That's better!  A little bunny peeping out...


Bunny's bottom is the bit of cashmere!