If you read this post you will know how I discovered the joys that can be had with a good bottle of fabric glue and some pretty fabric. Over the past couple of days I have been busy again with glue, paintbrush and sharp craft knife, transforming a few more items.
Most of them were things that would otherwise have gone into the recycling bin - good sturdy cardboard boxes, the sort of thing that I tend to hang on to, knowing they'll come in useful one day.
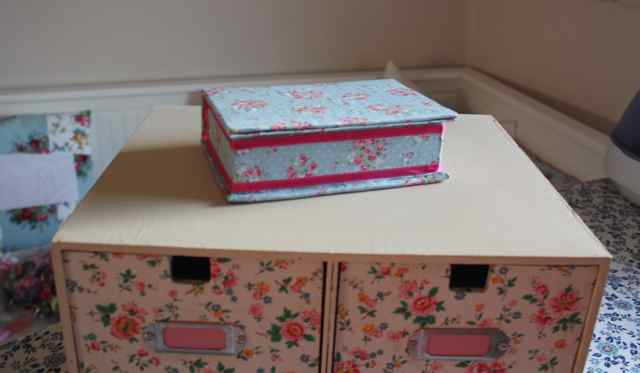
First was this one, which I covered in a vintage fabric. The lid was quite tight so it has ribbon attached inside to allow you to lever the lid off.

Next was this box, which had contained a set of notelets, writing paper and envelopes. I used a piece of 'Edenham' by Liberty for the lid, back and base, but left the sides uncovered for contrast. As the box had pictures and writing on, the dark fabric was a safe choice to cover it up.

I added some navy ribbon as a trim, and a deep red bow that I'd cut off another box! I'm thinking I may put a pad of good old Basildon Bond and envelopes inside, before taking it to one of this weeekend's markets.

Next came another box with a lift up lid. This one was already covered in fabric and lightly padded but it wasn't to my taste. I chose a pretty print with posies and polka dots, which I bought from Tikki London some time ago. It's a Sevenberry fabric. I trimmed it with ribbon in a complementary colour.
But this was where I learnt my first lesson. From afar, it looks okay, but get a little closer...

...and it looks a little shabby. Get closer still...

...and you can see the texture of the fabric underneath. So I won't be recovering any more padded, textured fabric boxes! I'll be keeping this one as it's not up to standard.
The next box was similar to the previous one in shape and size, but not covered in fabric. I chose a Mabel Lucie Attwell print, which I bought at the same time as the above (takes me a while to cut into things!)

The cardboard on this one was a bit flimsy, so I added a bit of wadding to the lid to give it a bit more substance. This was where I learnt my second lesson. Again, it looked okay from afar, but if you could see closer up (which you can't as my photography is so rubbish!) then you would see globs of glue that were held by the wadding showing through, and the lid has curled up slightly.

Another one to keep.
With only a 50/50 success rate with cardboard boxes, I have come to the conclusion that only very sturdy cardboard boxes are worth trying to cover.
Luckily I had some non-cardboard boxes.
There was a little jewellery box. I decided to leave the bottom half as it was, a a reminder of its retro credentials, and covered the lid with a bit of feedsack (from Sal's Snippets).

The inside had some white satin-y type material lining the lid, but this was badly marked so needed replacing. I used an old white hanky for this! The flock bottom was still in perfect condition, so I left this alone.

Next was the tin my Granny's button used to be in. It had looked like it had a Monet print on it, but on investigation, this turned out to be an old greetings card sellotaped on! As this was a tin, I wasn't sure if the glue would work. But it did, so the tin has now been Stanley-fied!

Last, but not least, another Ikea transformation.
It used to be a plain wooden box, with a mirror inside. Useful, but nothing special.
With a bit of Lecien fabric (also from Tikki)...

...it looks so much prettier!

The more successful of these will be coming to The Maltings this weekend! It is the regular monthly market on Saturday, then the special 'Vintage' event on Sunday, so it will be a hectic few days!
We had a visit from the Physiotherapy and Occupational Therapy Outreach team yesterday. Mr U-t-B now has a TENS machine (a chance for me to pay him back for the time he sent me into orbit when I was in labour and had managed to disconnect mine - he reconnected it, whilst it was still turned up to the highest level!) crutches, lots of useful advice and the promise to return tomorrow and turn our upstairs bathroom into something we hadn't expected for a good few years yet (shower seat/raised loo seat with frame...) The physio is also going to speak to the surgeon's secretary, so we hope to be able to move forward soon...
PS As I was checking this, the phone rang - it was the physio (fabulous woman!) who had already (at 9.10 am) contacted the surgeon's secretary and got an appointment for Tuesday.
Well done on all those boxes! And well done for persevering - the first sign of it going wrong would have been it for me! The IKEA one's fab. Could you sew something on top of the one with the wrinkled top to disguise the wrinkles, like little roses or bows? Glad you, or rather MR U-T-B, got an early appointment. Abby x
ReplyDeleteLovely boxes I'm sure they'll do well, great ideas for gift wrapping presents as well
ReplyDeleteThe boxes are all lovely - what transformations. Wow, you must have some patience. x
ReplyDeleteThese are fabulous (yet again) Alix. You've really inspired me!
ReplyDeleteWhat a wonderful job on the boxes ~ such pretty fabric you've used! So glad that things are progressing with Mr UTB. Love Brenda
ReplyDeleteThe boxes look great...good luck at the market:) Poor Mr U-T-B:(
ReplyDeletethese are gorgeous & I'm sure will be snapped up at the market.
ReplyDeleteI love your stanley-fied tin! You are very nifty with that glue, xx
ReplyDelete